Both Apple and Google have extensive guidelines on how to use their respective logos and create sign-in buttons that use their services.
Both companies provide their logo artwork for download, in both vector and raster formats, that you can use to create these buttons.
Apple sign-in button example
Apple has a helpful article Displaying Sign in with Apple Buttons on their website. It has a sample HTML code that if you write to a file and open the file in the browser, it will show you their branded sign-in button.
<html>
  <head>
    <meta name="appleid-signin-client-id" content="[CLIENT_ID]" />
    <meta name="appleid-signin-scope" content="[SCOPES]" />
    <meta name="appleid-signin-redirect-uri" content="[REDIRECT_URI]" />
    <meta name="appleid-signin-state" content="[STATE]" />
  </head>
  <style>
    .signin-button {
      width: 210px;
      height: 40px;
    }
  </style>
  <body>
    <div
      id="appleid-signin"
      class="signin-button"
      data-color="black"
      data-border="true"
      data-type="sign in"
    ></div>
    <script
      type="text/javascript"
      src="https://appleid.cdn-apple.com/appleauth/static/jsapi/appleid/1/en_US/appleid.auth.js"
    ></script>
  </body>
</html>
The appleid.auth.js script replaces the div that has the id appleid-signin with their SVG files.
Google sign-in button example
If you visit the Google documentation on Building a custom Google Sign-In button, it has a ready to use sign-in button example, which complies with their guidelines.
The quick and dirty way to create sign-in buttons
If I were working on a serious project, I would have used their SVG logos and created reusable button components using React. Though, it will be arduous to ensure the buttons match their policies. I am sure a designer worth their salt would not see it as a challenge. But I am no designer.
I needed “Sign in with Google” and “Sign in with Apple” buttons for a temporary project. So I decided to phone it in.
I would customize the size and some minor attributes of the example buttons on their website using the browser’s “Inspector” tool and then take screenshots of them. I will use those images in my project.
I could have used the scripts they provide to load the buttons from their servers, but my project was going to run in an offline environment.
The button size I require is 210x50 with no rounded corners.
Makeshift Google sign-in button
I opened the Google documentation that has the example button in the Firefox Developer Edition browser. Why Firefox Developer Edition? I will get to that, but it is essential to have Firefox Developer Edition.
I right-clicked and examined the button. It is almost the same size that I require.
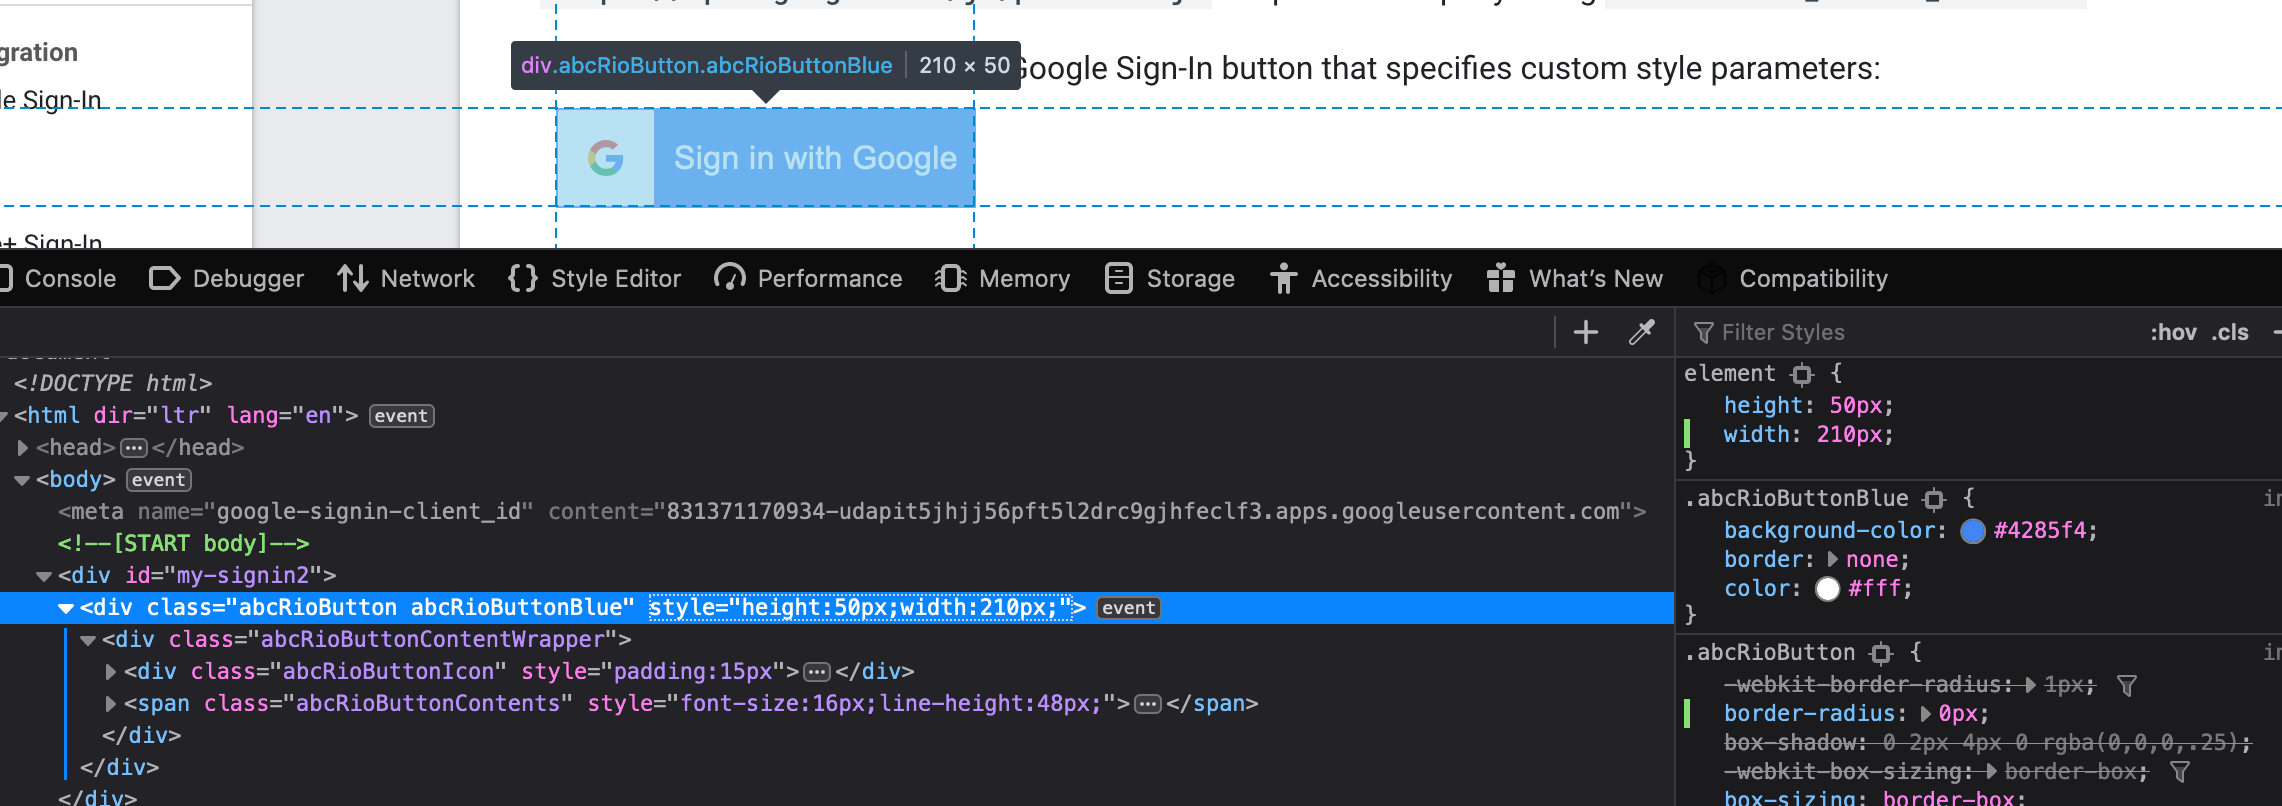
I only had to
- Disable
box-shadowin CSS - Set
border-radiusto 0 - Set the width to 210px from 240px
Luckily, the width change is only minor; otherwise, the button and logo would get out of proportion.
I right-clicked the node and chose “Screenshot Node” option. This feature is why I used Firefox Developer Edition. It is one of the many features that make Firefox Developer Edition more effective than Chrome for web developers.

Makeshift Apple sign-in button
Apple sign-in button required a little extra work because they do not have any HTML button on their documentation site. Their documentation uses images of buttons to explain their guidelines.
No big deal. Remember the HTML code I mentioned earlier? I modified it a little so that the button has a white background. You can see and run the code yourself here.
This button has rounded corners. On examining the rendered HTML in the browser inspector, I noticed it uses SVG for the border.
Removing ry attribute from the SVG removed the rounded corners.
<rect width="100%" height="100%" ry="15%" fill="#fff" stroke="black" stroke-width="1" stroke-linecap="round"></rect>
I adjusted the height of the root div from 40px to 50px. Width was already 210px. Then I right clicked on the root div and selected the “Screenshot Node” option.
The resulting image had white borders outside the black outline of the button. I am not sure what the reason is.
It’s a quick and dirty hack. So I didn’t investigate it further. Instead, I set the background-color of the body to black using Firefox’s CSS editor.
Now when I took the screenshot of the node, the result did not have the white border.
Adjust the image size
Now I examined the image sizes using the good, old, trusty ImageMagick.
$ identify apple.png
apple.png PNG 1260x300 1260x300+0+0 8-bit sRGB 22512B 0.000u 0:00.000
$ identify google.png
google.png PNG 420x100 420x100+0+0 8-bit sRGB 5914B 0.000u 0:00.000
Focus on the part that comes after PNG. That’s the dimension.
You see that google.png dimension is 420x100. But in the browser, I set it to
210x50. What happened? Retina display happened. My machine has a retina display
because of which this image is 2x its set size.
Apple button size is enormous. I have to cut it down.
convert apple.png -resize x100 apple-h100.png
-resize tells ImageMagick to resize the input image.
x100 means set the height to 100, and adjust the width to keep the perspective.
Let’s check the dimensions of the result.
$ identify apple-h100.png
apple-h100.png PNG 420x100 420x100+0+0 8-bit Gray 256c 4725B 0.000u 0:00.000
So now I have a Google sign-in button image, and an Apple sign-in button image, in my required dimensions, which 100% conforms to the official guidelines.
I ran both the images through ImageOptim to reduce their sizes, which decreased their sizes to 4kb each.


Conclusion
Honestly, it took me more time to write this article than it took me to get the image buttons.
But should you use this “technique” in the production?
Although each image has a minuscule size of 4kb each, your web page will still have to make additional two requests to the server to fetch them. Usually, we want to minimize the number of requests to the server to improve the page’s performance. Therefore, I would not advise using it in production.
Then again, it is possible to use loader like this to convert your image to base64 encoded strings automatically and inline them. If your build pipeline supports such loader, then you can use the images without worrying about the additional requests. But if you use the loader for too many images, then your page size will get hefty.
So choose wisely!